I share all I know about using a sewing machine all the time, but the truth is that sometimes a sewing machine simply isn’t available or fit for the job. Today, I want to talk about something else. It’ll be especially useful to those who need to deal with heavyweight materials for their crafts, or all my fellow outdoors enthusiasts that occasionally need to repair sails, sporting equipment, and really anything made of leather or thick canvases. Here, I’ll share a little bit about an amazing tool that you can bring anywhere with you: a sewing awl.
If you’ve never heard of it – here’s a great opportunity to learn about this amazing tool. Everyone occasionally gets into situations in which a sewing awl might prove useful. And if you already know what it is – scroll down for detailed instructions on how to use a sewing awl!
What Even Is a Sewing Awl?
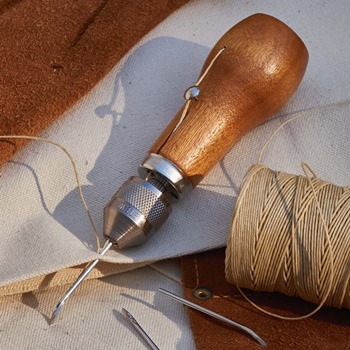 A sewing awl is a manual sewing tool with a large needle. This tool is usually used for heavyweight fabrics like leathers, thick canvases, and upholstery fabrics. In modern awls, the spool of thread is set up inside the body of the awl, making the process neater, and the tool easier to store.
A sewing awl doesn’t make stitches on its own like a mini sewing machine does – instead, the awl is used to puncture the hole and push the thread through the fabric, after which the user manually sews by forming a lock stitch with the other end of the thread, pulling the awl out, making the next puncture, and repeating the process.
What Are Sewing Awls Used For?
Sewing awls are useful for many things, and one of these is a great tool to have in the glove compartment of your car or boat, or in your hiking backpack. But it’s not only useful on the go. Sewing awls are a fantastic tool for craftspeople who like working with thick and tough materials like canvas, duck cloth, and leather.
A sewing awl is a tool that can find its place in a toolbox of:
- Leatherworkers like shoe repairmen and leather craftspeople
- Sailors that need to fix sails and cushions
- Outdoor sports enthusiasts
- Crafty people who like scrapbooking, bookbinding, and bookmaking
- Upholsterers and people who work with fabric and leather furniture (the bent needle awls are perfect for this use).
A Word on Sewing Awl Thread
Since awls are intended for use with heavyweight fabrics, regular sewing thread simply won’t do. Thread for sewing awl is usually thick because it needs to hold the tough fabrics together for a long time.
Sewing awl thread can be made of both natural and synthetic materials, and in most cases, the thread is waxed. The wax helps the thread glide through the materials with ease. The choice between natural and synthetic thread is on you, but you should keep in mind that natural threads don’t pair well with leather. That’s because the chemicals used to treat leather can speed up the deterioration of natural threads, so synthetic ones are recommended for projects involving leather.
Sewing Awl Anatomy
1. The Handle
Most sewing awls have a large, easy to grasp handle made of wood. Since awls are made to pierce tough fabrics, the handle must be designed so it’s not uncomfortable to repeatedly put force into it. Some awls have a handle that can be opened to expose internal storage for the thread spool, which comes out a little hole in the handle and includes a tension system for the thread.
2. The Needle
The needle of an awl is quite similar to a regular sewing machine needle, except much bigger and tougher. Unlike hand sewing needles, the sewing machine and awl needles have their eye located at the bottom of the needle, quite close to the sharp tip.
Sewing awls can utilize both a straight and a bent needle. While the use of a straight needle is pretty straightforward (pun intended), the bent one is used for upholstery and similar projects where the needle doesn’t pierce all the way through the material.
3. The Coupler
Also known as the chuck, the coupler is the piece that holds the awl’s needle in place. In fact, many modern sewing awls let you swap the needle, so you don’t have to purchase a separate awl if you need to pick between bent, straight, and different sized needles. You’ll need a lock wrench to loosen and tighten the coupler on a sewing awl.
4. The Thread Spool
Sewing awls have their thread set up on-board, either right under or inside the handle, depending on the particular model. In most cases, the thread needs to be wound by hand on a spool approximately the size of a bobbin.
How to Use a Sewing Awl?
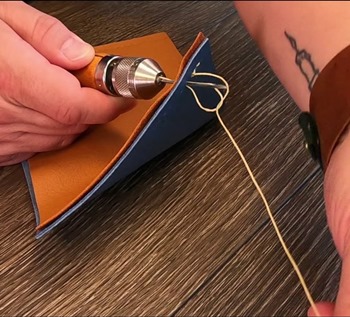 Once you get the right kind of thread and set up your sewing awl, you can get to work and sew.
If you’re a visual learner, I recommend watching this video that gives you a handy and easy to follow tutorial on sewing with a Speedy Stitcher. But if you prefer written instructions, read on!
- Set up your fabrics. Push your awl needle through the fabric, then, draw out enough thread to do the entire project. You’ll need about the length of the fabric, an extra 3 inches, and all of that times two.
- Pull the needle back out of the fabric. Pull out so much that your fabric is on the center position of the thread.
- Now go on and pierce the next hole where you want it. Push the needle all the way through the hole, and then pull it back slightly so that a small loop forms.
- Take the other end of the thread (the loose half), and pass all of it through the loop that formed when you pulled the needle back.
- Hold the soon-to-be stitch tightly with your fingers while pulling the awl back out. Pull it out completely, until the lock stitch feels nice and tight.
- Repeat these steps as many times as you need.
- Once you reach the end, cut the thread and tie the two ends, then trim the excess.
That’s Awl, Folks!
I hope that was helpful and taught you all you need to know about this handy tool! A sewing awl is one of those tools that you’ll be really grateful to have once the time comes.
If you have any questions left, don’t hesitate to drop me a message down in the comment box!