When you’re just learning how to sew, threading your sewing machine can be intimidating. However, there’s nothing to fear – once you understand how to put a bobbin in a sewing machine, threading your sewing machine with a bobbin will come naturally and you won’t even have to think about doing it.
Still, doing it for the first couple of times can be difficult. That’s why I decided to make this series of blog posts about setting up and threading your sewing machine.
Read the general sewing machine set up guide here, or jump onto threading the top spool by following this link.
What Even Is a Bobbin?
 Sewing by hand only requires one needle and one piece of thread to make a stitch. But a sewing machine is different – it uses two spools of thread to make a stitch – and that’s why machine-sewn garments are always more durable.
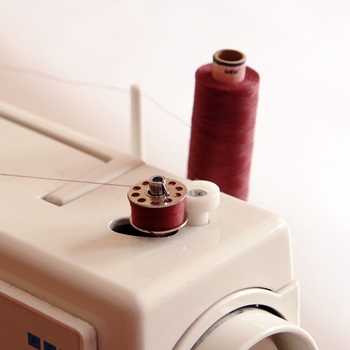
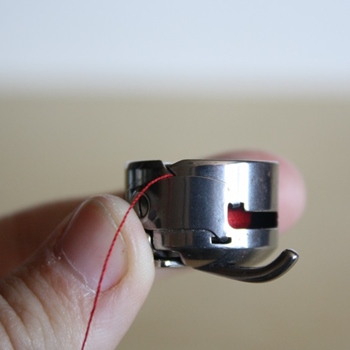
One of the thread spools is always visible. It’s the thread that goes through your needle, and the thread spool is usually set up at the top of the machine. The other thread spool is called the bobbin. The bobbin is a small plastic or metal spool that is safely tucked into a bobbin case and loaded under the needle plate (the metal plate with a hole through which the needle moves up and down).
The top spool runs the thread through the needle. When it pierces the fabric, the thread from the needle gets latched to the thread from the bobbin. The bobbin then loops it around the thread, and as the bobbin case spins, the two threads create a stitch.
You should keep in mind that bobbins are not universal. You need a set of bobbins that will fit into your machine perfectly – and usually, the particular bobbin size depends on the manufacturer. If your sewing machine didn’t come with enough bobbins, you should get the ones that the machine manufacturer recommends for your model.
Bobbin Winding
With regular thread spools, you purchase them already wound, so you just need to attach the spool to the machine, run the thread through the needle, and that’s it. Bobbins are different – bobbins come empty, and you need to wind the thread you want to use to them. Personally, I always keep a few pre-wound bobbins with black, white, and light grey thread for quick fixes.
That being said, different sewing machines apply different ways of bobbin winding. That’s why you should first and foremost get your instruction manual. When you do, it’s time to locate these key parts that you’ll need to wind your bobbin. Chances are that they’re all located at the top of the sewing machine, near the pin for your top thread spool. Here’s what you should locate:
- Spool pin for your regular thread
- Bobbin winding tension disc (actually, it usually resembles a button that you hook the thread around)
- Bobbin winding shaft (or pin – smaller than the regular spool pin)
Once you figured out the parts, pick an empty bobbin and the thread you want to use.
- Put the spool of thread onto the spool pin, but don’t continue running the thread through the machine.
- Run the thread left towards the bobbin winding tension disc, and wrap it around it.
- Pass the end of the thread through the little hole on the bobbin from the inside outwards (to be honest, I don’t actually do this. I simply wind the thread around the bobbin a couple of times until it feels nice and secure).
- Now run the thread and bobbin towards the bobbin winding shaft and place your bobbin onto it (make sure the shaft is in its left position to do this. You will have to match the position of a little slit on the bobbin and the spring on the shaft to snap it in place.)
- Push the winding shaft with your bobbin into its right position.
- Step on your foot pedal and let the machine spin and do the job – remember to keep your hands away from the needle, as it will go up and down in a sewing-like motion when you do this.
- Once the thread on the bobbin reaches the little stopper to its right, the winding is done.
- Snap the bobbin shaft back left, cut the thread, and remove the bobbin from the shaft.
- If you pulled the thread through the little hole on the top, you might have to trim the excess.
Put the Bobbin into the Sewing Machine
Sewing machines either have a front loading or a top loading bobbin system. In general, older models and heavy-duty sewing machines have a front-loading bobbin, while newer models rock the top loading bobbin system.
1. Front Loading Bobbin
The front-loading bobbin is somewhat harder to reach than the top-loading one.
Most machines with the front-loading system have a sort of an extension for the work station (which often doubles as an accessory box) which needs to be removed. The removable part is located at the bottom front, and it’s usually removed by sliding to the left.
Tip: When you remove this front piece, you get what’s called a “free arm” – the reduced workspace that lets you hem tubular pieces like sleeves and pants. Chances are that even a top-loading sewing machine has a way to access the free arm.
- Turn off the machine, and raise the needle to the topmost position by turning the flywheel towards yourself.
- Once you remove this work station extension, you’ll expose a little hinged cover just below the needle plate. Open it, and you’ll see the bobbin case.
- Lift the lever to take out the bobbin case and insert the wound bobbin into it.
- Leave a couple of inches of a thread tail, and pull the thread through the slit in the bobbin case. Then gently pull the thread and see which direction the bobbin spins. Check your machine’s manual to see whether the bobbin should turn clockwise or counterclockwise inside the bobbin case.
- Check the instruction manual to see which direction the lever on the bobbin case should face. On my Singer, it’s set to face left. Hold the lever on the bobbin case and put it onto the hook pin. Release the lever. You should feel or hear a click when the case sits in place.
- Insert the top spool and thread your needle. Hold the loose end of the top thread in your hand and pull it slightly to the left. Then, turning the flywheel towards yourself, let the needle hit the bottommost position and go up again (just continue turning the flywheel towards yourself). Once it goes up, you’ll notice the top thread is pulling the bottom thread up. Let it go – the needle will pull the bobbin thread right through the needle plate.
- Put both threads under the pressure foot.
- Now you can close the cover and return the workspace extension – you’re ready to sew!
2. Top Loading Bobbin
 Loading the top bobbin is somewhat less difficult compared to the front bobbin, especially since the bobbin compartment is easier to reach. Additionally, top-loading systems don’t have separate bobbin cases – you simply drop the bobbin in.
I’ll give you the general outline for loading the bobbin at the top, but you should consult your instruction manual for specific directions.
- Turn off your machine
- Raise the presser foot using the lever at the back, and turn the flywheel to set the needle in the highest position
- Open the bobbin cover (this is usually done by clicking a button to the right of the cover)
- Insert the wound bobbin into the bobbin slot. Check your instruction manual to find out whether you should load your bobbin so it turns clockwise or counterclockwise.
- Pull the bobbin thread towards you and through the slit, and holding the bobbin down gently, pull the thread to the left until it reaches the end of the pressure plate and comes out the other slot.
- Pull around 5 inches of thread out the bobbin case and toward the left.
- Make sure your needle is threaded. Hold the tail of the needle thread towards the left. Rotate the flywheel towards yourself as the needle goes down and back up. As it rises up, you’ll notice the top thread pulling the bobbin thread out through the needle plate.
- Set both threads to go under the pressure foot, not over it.
- Close the bobbin cover, and you’re ready to go!
You’re All Done!
There you have it – learning how to wind and set up your bobbin may be a handful at first, but the truth is that it becomes second nature very quickly! I hope my guide helped you learn how to do it as simply and efficiently as possible. Now that you know how to thread your machine, let’s go get crafty! If you have any questions for me, don’t hesitate to ask down in the comment box!