Whether brand new or second hand, getting a sewing machine is so exciting. But you gotta sit tight – before you can tackle the hundreds of fun projects you’ve been wanting to do, you need to set up your sewing machine.
In this article, I’ll walk you through the steps you need to take before you can start sewing, from unboxing to threading.
Make Sure All Parts are Present
 A sewing machine box does not only contain the machine. You’ll likely get a plethora of additional parts and accessories with it.
I know you can’t wait to start setting up. But first, it’s important to make sure that your box contains everything it should. Take everything out of the box, and find the machine’s user manual. Find the pages that list sewing machine parts and accessories – these should be somewhere close to the beginning.
Chances are that your sewing machine comes already assembled, even with a piece of test fabric under the presser foot (if you’re not sure what that is, check out my post about sewing machine anatomy or look for the name in the user manual section listing the machine’s parts). However, you might get the machine partly disassembled, especially if you got it second hand. In either case, if you’re new to sewing, disassembling some parts and getting them back together might prove useful and make you feel more confident around your new machine.
First of all, make sure that you can find the electric cord and the foot pedal in the box. If your machine is manual or battery-powered, check whether you have all the necessary parts.
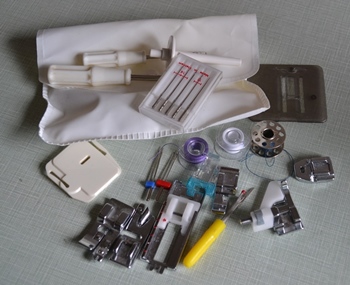
1. The Accessory Box
If your sewing machine is fully assembled, go on to the next page to see all the accessories you should have. The accessory box (also called removable storage compartment or an accessory tray) is usually a part of the sewing machine itself. Located just under the sewing machine ‘work station’, the box can usually be removed.
You should find a bunch of accessories inside, such as needle packs, bobbins (small, round spools, plastic or metal), a spool pin with caps, a buttonhole opener, a few different presser feet, and even a screwdriver or two.
Second-hand machines may not have all of these accessories. Make sure that you have, at the least, a fitting bobbin and an all-purpose presser foot.
2. Something’s Missing?
If some of the accessories or parts are missing, you should address the issue right away.
First of all, take a photo. If some of the accessories are missing, make sure everything you did get is clearly visible. You might need to send the seller the photo as proof.
Try to find the seller’s information in the paperwork. If you can’t find any customer service or contact information phone number or email, you should contact the place where you bought your machine.
Unless you don’t really care about the missing parts (which is also ok if it’s, for example, a highly specialized presser foot you don’t really see yourself using), get in touch with the customer service as soon as possible.
Warranty and Registration
You might need to register your sewing machine on the manufacturer’s website if it’s brand new. This process makes it easier to claim the warranty.
In most cases, you need to go on the manufacturer’s website and register with a serial number that you can typically find on a sticker on the machine itself.
Once you finish your registration, put your warranty paperwork in a safe place, so that you can easily find it if something goes awry.
Read the Instructions
In this post, I can only give you generalized information that applies to most electric sewing machines. However, something might be different on the particular model you got. That’s why you should always check out the instruction booklet that you got with your machine.
Always favor the information you find in the official instruction handbook to any other source.
The user manual will not only tell you how to set up and use your sewing machine, but it will also have useful info on safe operation.
Here’s some of the most important safety advice when setting up and operating your sewing machine:
- Only use the machine for its intended purposes, and don’t try to sew unsuitable fabrics
- Keep hands away from moving parts. Always turn off the machine before changing needles, pressure feet, thread, and other parts
- Unplug the machine when you don’t need it, or when performing maintenance and oiling.
- If any electronic part has been damaged or exposed to water, don’t use the machine
Set Up Your Sewing Machine
 Once you have all of the parts, accessories, and the instruction manual in front of you, it’s finally time to start setting up.
The very first step you should take is to find a suitable place for the machine. Make sure you have plenty of free workspaces, especially to the left-hand side.
1. Connect to Power
Time to power up the machine!
Most electric sewing machines are either powered by a direct power cord or a cord that runs through the foot pedal (not the same as presser foot – the foot pedal is operated by your foot, similar to car pedals). However, battery-operated models might be different, but typically these also have a foot pedal.
Connecting your sewing machine to a power outlet is similar to any other appliance. Simply connect the cord to the socket on the side or the back of the sewing machine, plug the electric cord into an electrical outlet, and click the on/off switch. If the machine’s light bulb lights up (provided that the model has one), everything’s in order!
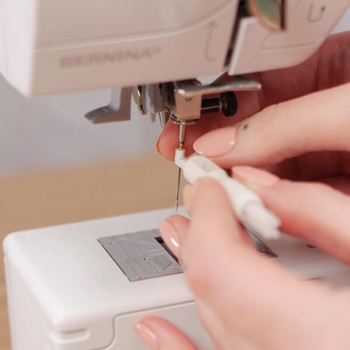
2. Set Up the Needle
In the pack of needles in the accessory box, you will either have a pack of identical, medium-sized needles, or a variety pack with several needle thicknesses. Which needle you use depends on the fabric you want to work with – thin, lightweight fabrics are best sewn with a thin and delicate needle, but you’ll need a thick one for heavyweight, thick, and robust fabrics. If you’re new to sewing, I suggest mastering the medium fabrics and needles first.
That being said, here’s the right way to install and set up the needle into your sewing machine.
- Turn your machine off
- If a presser foot is installed, put it down to the lowest position
- Turn the flywheel (the wheel on the right side) to raise the needle to its highest position (Tip: Always turn the flywheel towards yourself to avoid jams)
- At the back of the needle holder, there’s a screw that you should loosen
- Insert the needle into the holder so that the flat side of the needle is facing back
- Push the needle up as far as it can
- Hold the needle while you tighten the screw at the back of the needle holder
3. Remove and Attach the Presser Foot
The presser foot plays an important function – it holds your fabric down and makes sure the needle works precisely and without any issues.
You might get a plethora of different presser feet in your sewing machine’s accessory box. They come in all forms and sizes depending on the particular use they have. Because of that, you’ll find yourself changing the pressure foot on your machine every now and then. Luckily, removing and installing presser feet is easy.
There are different ways presser feet are attached to sewing machines. Most electric sewing machines utilize a snap-on presser foot system, but some also have a screw-on presser foot system too (this is particularly handy for beginners at sewing since the screwed-on foot has no way of falling off on accident). Here, I’ll focus on snap-on presser feet systems since they’re by far the most common.
To remove an already attached snap-on presser foot, follow these steps:
- Turn the sewing machine off
- Turn the flywheel to put the needle to the highest position so it gets out of the way
- Raise the presser foot by snapping the lever at the back or to the right of the presser foot
- Click the button at the back of the presser foot. This will release the foot, letting it fall off the holder
To attach a snap-on presser foot, do this:
- Make sure your sewing machine is turned off
- Place the desired pressure foot right under the empty pressure foot holder
- Lower the pressure foot lever slowly until the holder shank reaches the horizontal pin on the pressure foot
- You might need to press the button at the back of the pressure foot holder to let the foot snap in place, or it might happen on its own when the lever-operated holder reaches the lowest position
Threading Your Sewing Machine
 Once your sewing machine parts are all in place, the final step before you can start sewing is threading your machine.
Sewing machines use two spools of thread to make stitches: the top spool, and the smaller spool called bobbin that is placed down, under the pressure foot.
Since threading takes some time to master, I decided to make separate sewing machine threading guides here:
You’re All Set!
That’s it – you’ll see that setting up your sewing machine gets easier and simpler with time – but it does take a bit of effort to master. Hopefully, my guide helped get you started in the wonderful sewing adventure you have right ahead of you!