 A sewing machine is an important part of many households worldwide. There are many reasons why this device hasn’t gone obsolete, even in the age of cheap fast fashion.
With a sewing machine, you can have better control over your wardrobe. You can modify pieces you own to suit you perfectly and mend them to make them last longer. You may even turn to your creativity, and make unique pieces of clothing. Alternatively, you might sew household necessities like curtains, tablecloths, and pillowcases all by yourself, making them exactly to your liking.
There are so many reasons why you might want to take up sewing. But getting started can be tough. The sewing machine looks quite intimidating at first glance. That’s why we decided to make a guide that you can refer to on your journey to becoming a great tailor.
Types of Sewing Machines
First things first, we need to take a look at the different types of sewing machines out there. If you already own a sewing machine, it’s very important to determine what kind of machine it is. On the other hand, deciding exactly what you need is vital before you invest in a machine of your own. We wrote extensively about the various types of sewing machines and reviewed many great models on our website.
1. Manual Sewing Machines
Manual sewing machines are what you imagine when you think of your grandmother creating that quilt that is now a family heirloom. But despite what you may think, manual machines are made and sold to this day, because they are the single most reliable choice out there.
Unlike other types, manual sewing machines are usually completely made out of metal. While this adds to their durability, it also makes them very heavy, so they’re not usually moved and stored as easily. Some of them come with a stand or even set up on their own table or cabinet.
This type of sewing machine is usually operated by foot, and the tailor manually operates the treadle (foot pedal). They don’t require or use electricity (except some that need it for the light bulb). While this is what makes them very reliable, it also makes them the slowest models out there.
2. Electronic Sewing Machines
Electronic models can do everything that a manual sewing machine does, and so much more. Since these run on electricity, they can be very quick, and some heavy-duty models can make over a thousand stitches per minute. The tailor runs this machine with a foot pedal, and most often, the stitching speed changes according to the amount of pressure they put on the pedal. Electronic machines also come with the benefit of various stitch styles, which are easy to pick and modify.
An electronic sewing machine allows you to make a wide variety of stitch work. From buttonholes to simple embroidery and monogramming, you can do almost anything on an electronic machine very quickly. However, the variety depends mainly on the model you choose – some come with a very limited number of stitches, while others have dozens. Electronic sewing machines are suitable for beginners, and there is a large variety of models out there.
3. Computerized Sewing Machines
Computerized models are the next generation of electronic sewing machines. As such, they can get quite expensive, but the variety of options they offer makes the tradeoff worthwhile.
Top-rated digital sewing machines come with an astonishing amount of stitching styles. In general, the number of different utility and decorative stitches ranges from 20 to as much as 200, and some models come with even more. The most important benefit of a computerized machine is that it can have its software updated for bug fixes and new features. Additionally, some computerized models allow you to download new stitch styles or embroidery patterns from the internet (or make your own!) and transfer them to the machine.
4. Embroidery Machines
An embroidery sewing machine is a specialty device, and this type is popular among tailors who already own an all-round sewing machine. However, you can find combination embroidery and regular sewing machines.
Embroidery machines are designed to make monograms and embroideries. That requires the usage of an embroidery hoop, which holds the fabric tight, and gives the machine a precise control over the positioning of stitches. Because of that, embroidery machines are typically computerized, and they come with the possibility to import custom patterns, and even make slight modifications on the machine’s screen directly before embroidering.
5. Serger, or Overlock Sewing Machines
A serger is a specialty machine that has the power to make your home-made garments look as professionally made as store-bought. In short, sergers (also known as overlock sewing machines), are designed to give you a perfect edge.
The top-rated serger sewing machines are not made to do the job of a regular sewing machine, so they’re a perfect addition to any tailors workshop. These machines employ an inbuilt cutter blade, which trims the edge. After the edge is cut to perfection, a serger uses between two and five thread spools to “overlock” thread around the edge of the fabric, leaving you with that perfect edge that doesn’t unravel or tear.
How is a Stitch Made?
 You probably already understand how needle and thread can help you stitch a piece of fabric. However, while the same basic principles apply, the mechanics of machine sewing are very different from hand stitching.
The main difference between hand and machine sewing is that machines use two pieces of thread to do the job. From the outside, you can see the familiar needle passing thread through your fabric. But on the inside, there is a spindle called “bobbin”, which uses the second thread to make a loop, creating a stitch.
What Does the Bobbin Do?
The fact that you need both needle and bobbin thread means that whenever you want to start sewing, you need to set up two spools of thread. The first one usually stands on the top of the machine and goes through a particular path (usually labeled with print directly on the machine), and finally going through the eye of your needle. The second spool of thread is wound around the bobbin. You need to do this yourself. The bobbin is usually located directly under your needle. Newer sewing machine models have a drop-in bobbin, which is easily accessed if you open the lid near the needle plate (the plate under the needle). On the other hand, other machines may require you to remove the front piece of your machine’s work desk to reach the vertically set up bobbin. Most sewing machines come with a system for easy bobbin winding, typically located at the top, near the other thread spool.
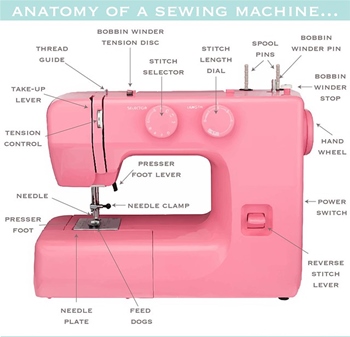
Other Parts That Play a Role in Stitching
Now that you know the basics of machine sewing, let’s take a look at other parts that make stitching possible.
1. Foot Pedal
Sewing machines are typically operated by a foot pedal, which is quite similar to the gas pedal in your car. The pedals are often sensitive to pressure, so you can control the stitching speed with how much pressure you put on the pedal.
In manual sewing machines, you need to create energy by moving a swinging treadle with your foot. On the other hand, you can run and change the stitching speed of many computerized sewing machines with a simple press of a button.
2. Flywheel
The flywheel is a wheel or a knob, typically located on the right side of your machine. Also known as a hand wheel, a flywheel lets you manually raise and lower the needle. This feature is used before you start sewing since you need space to set up your fabric. It’s also used after you’re done stitching, to raise the needle and free up your fabric so you can remove it from the machine. Finally, the flywheel is quite useful when setting up your thread and needle.
3. Feed Dogs
Feed dogs are an essential part of your needle plate. They are located under your needle, and they look like two (or more) rows of metal spikes or teeth. While you sew, the feed dogs move back and forth, grasping your fabric, and moving it backward. This way, the teeth literally feed the fabric through your machine. Feed dogs are a great help for stitching a straight line. Because of this aid, you don’t need to steer your fabric with a lot of force while sewing – you can simply rely on the feed dogs for a straight line, and merely hold down the fabric to ensure even feeding.
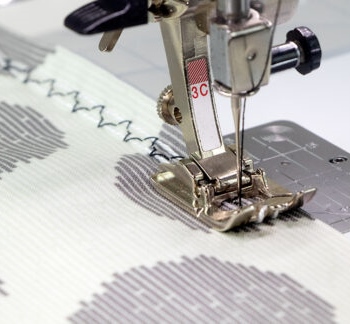
4. Presser Feet
You probably received a bunch of different accessory presser feet with your machine. A presser foot is a metal or plastic piece which is mounted near your needle. It has a hole for the needle to go through, and its main purpose is to hold fabric down from the top, while feed dogs do their job. Before you can start working and after you’re done stitching, you need to manually lower and raise the presser foot, typically using a lever or a button near it. You can use different presser feet for various kinds of jobs, including making a buttonhole, hemming, darning, sewing zippers, blind stitch, and many more. A presser foot might be attached with a snap-on mechanism, or secured with a screw.
Set-Up Buttons and Knobs
Apart from these basic functional parts, your sewing machine also has some additional buttons and knobs which let you modify and set-up your stitch to match the project you’re working on.
1. Reverse Switch
Once you engage the reverse switch, your sewing machine starts stitching in reverse, and your feed dogs move your fabric backward. This process is called backstitching. It’s very useful for making your seams sturdier, especially at the start and at the end, but it can also be quite useful when embroidering or making difficult turns.
2. Stitch Selector
Coming in the forms of both a knob and a set of buttons, the stitch selector helps you find the perfect stitch for your project. Depending on the model, your sewing machine might have anywhere between 1 and 200 different stitch options. However, most modern sewing machines have the two basic ones, which are sufficient for most general clothes and accessory construction sewing – the straight stitch and the zig-zag stitch.
3. Stitch Length Selector
Stitch length is one of the most useful settings on your machine. If we consider the basic straight stitch, stitch length determines how much fabric passes under the needle between two stitches. In other words, how long the breaks between stitches are. The proper stitch length depends on your fabric selection, but also the effect you want to achieve.
4. Stitch Width Selector
Apart from moving up and down, your needle can also move to the sides – left and right. This is what makes zig-zag and many decorative stitches possible. In some machines, you can adjust the width, too. Stitch width doesn’t mean a lot if you’re considering the basic straight stitch, but it makes a big difference with other stitches.
5. Tension Regulator
When your machine makes a stitch, both threads should have proper tension for the stitch to look good and feel secure. If your fabric is puckering or stretching around your seam, your seam has skipped stitches, or one of the threads seem too loose or tight, you need to adjust the thread tension. There is generally a numeric tension regulator on most machines, but not all machines give you an obvious way to set up the tension. If you can’t find the tension regulator even with the help of your machine’s user manual, your only option might be to regulate the bobbin tension via a screw on the bobbin case.
Wrap Up
Starting to sew can seem daunting at first glance because a sewing machine comes with an intimidating amount of unknown buttons and knobs. However, like with all new crafts, it’s very easy to pick up on all the different features once you have the hang of the basics. We hope we managed to make your beginning seem a bit more fun and a little less scary. Believe us when we say that little by little, project by project, you too can become a master tailor.