 Investing in a high-quality sewing machine is great because you can be sure that it will serve you well for years to come. But if you’re hoping to have your new sewing machine last very long, so you can even pass it on to your children and grandchildren, you need to make sure you give it the maintenance it needs. Luckily, keeping your sewing machine in tip-top shape is not hard at all, even though the machines are complex and powerful. By investing just a bit of effort every couple of months, you can be sure that your machine will live a long, happy life.
So, how exactly do you take proper care of your sewing machine? There are two essential steps to take – cleaning and oiling it regularly. Let’s take a look at the best way to enhance the lifespan of your sewing machine.
1. Getting Ready
Whether you have a basic sewing machine, or you own a specialized quilting or embroidery unit, maintenance is rather simple and similar across different kinds. Even if your model is a serger sewing machine, the same principles of cleaning and oiling apply, except that you need to be careful not to cut yourself on the machine’s blade!
The basic equipment you need should be included with your sewing machine, but you can get everything separately as well. For any cleaning and oiling job, you’ll need:
- Brush – a nylon lint brush, or a clean, regular painting brush
- Screwdriver – suitable for the screws on the needle plate
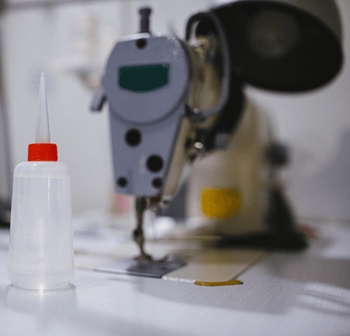
- Sewing Machine Oil – don’t use regular machine oil, look for one made specifically for sewing machines
- Cloth – a regular cloth that doesn’t leave fibers behind. Go with a muslin, cotton, or microfiber cloth
Make sure you’re working in a well-lit room. You shouldn’t rely on your sewing machine’s built-in light bulb, because you must TURN OFF AND UNPLUG the machine when doing maintenance!
Finally, you should be sure you know your sewing machine anatomy before continuing (at least the basics)!
2. How to Clean Your Sewing Machine
Once you gathered everything you need, and you turned off and unplugged your machine, you can get to cleaning it.
2.1. Disassemble
First of all, you should take your needle out of the machine. This is extremely important. To help you clean your machine more efficiently, you should also remove the pressing foot.
Take your screwdriver and unscrew the screws on the needle plate. There are usually two or three screws on there. Remove the needle plate. Then, if your machine has a front-load bobbin, remove the workstation extension and open your bobbin compartment. Owners of drop-in bobbin sewing machine models only need to open the compartment and remove the door if possible.
Remove the bobbin case from its slot, and if you can, also remove the parts behind it as well. Some machines have two hands, while others let you release the behind parts of the bobbin slot with a press of a button. Alternatively, your machine may have a screwed-on plate covering the behind of the bobbin slot. The main parts you should remove are the hook ring and the bobbin hook behind it.
2.2. Brush
Once you’re done with removing the needle plate and the bobbin construction, you’re ready to get rid of all the built-up lint. You may be surprised by how much lint and fuzz there is, but that’s completely normal.
Take your brush. You can use a provided lint brush, or a regular paintbrush (unused, of course). Generally, you should go with a nylon brush. You may even use a clean toothbrush, but maneuvering with it may be uncomfortable.
- DO NOT USE AIR – whether canned air or blowing into the machine. This can have disastrous consequences, and you may push lint further into sensitive machine parts, or even worse, get bits of water and saliva on the metal parts.
Sweeping towards the outside of your sewing machine with your brush, clean the lint buildup. Pay attention not to push lint further down into the machine, but instead, use gentle strokes. Pay special attention to cleaning the feed dogs. Clean out the lint in and around the bobbin case, and all of the bobbin components as well.
After you’re done cleaning, you may proceed to oil your sewing machine, or simply reassemble the parts and start your next project!
2.3. How Often Do You Need to Clean Your Sewing Machine?
Naturally, you need to know how frequently you should clean your sewing machine. The truth is that there is no simple answer to that question.
In general, it’s recommended to clean your machine with each completed project. However, this depends on the size of your project and the fabrics and threads you use for it. Some fabrics create more lint, so you may even have to clean your machine in between sewing sessions. On the other hand, if you see that there is little to no lint gathered up under the needle plate, you can go for another project without cleaning. Generally, try to clean your machine at least once a month if you use it more than twice a week, and more or less frequently depending on your particular situation.
3. How to Oil Your Sewing Machine
 Oiling your sewing machine may seem intimidating at first, but it’s quite simple if you follow the general guidelines.
3.1. Get Your Manual
The first step to every successful oiling is consulting your sewing machine’s user manual. Most sewing machines have a unique construction, so different specific parts require oiling.
- Tip: If you don’t have a physical copy of your manual, you can find a digital copy online. To find it easily, you can search with these keywords: your machine manufacturer and the model name + “manual”. So, if you own a Janome HD1000, your search inquiry should look like this: “Janome HD1000 manual”.
3.2. Oil
When oiling your machine, you should always use oil made specifically for sewing machines. Never use regular machine oil or 3 in 1, because these can leave sticky residues that can ruin your thread and fabrics. Sewing machine oil is watery and clear, but more importantly, it’s readily available and very affordable.
That being said, how do you apply oil, and where?
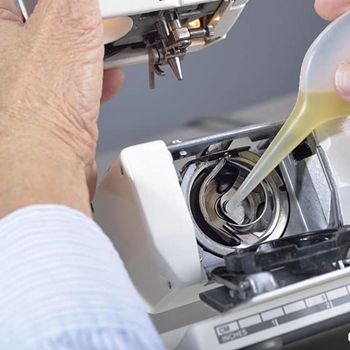
As we already mentioned, you should consult your machine’s user manual for specific instructions. However, as a general rule of thumb, you should oil spots where moving metal parts meet each other. Most notably, you should oil your bobbin hook and ring, and the moving construction of the top needle. You will likely need to remove the face plate of your machine to reach it.
You can inspect your sewing machine for moving parts that may need oiling by turning the hand wheel. The hand wheel moves the needle in the same way it usually does when you’re sewing. Moving the hand wheel back and forth will let you find the spots where metal parts meet and create friction.
You shouldn’t use too much oil. It’s enough to put a single drop of oil onto a spot.
When it comes to the bobbin components, you can oil them with a clean cloth that doesn’t leave fibers (we recommend a muslin or microfiber cloth). Put a couple of drops of oil on your cloth, and rub it across all of the removable bobbin casing parts. Make sure to wipe them with a clean side afterward – you don’t want too much oil on them, or your thread will be all oily and sticky!
3.3. How Often Do You Need to Oil Your Sewing Machine?
As with the ideal frequency of cleaning, the answer to how often you should oil your machine is: It depends.
Generally, the main variable is how often you use your machine. If you use your machine more than a couple of times per week, you should stay on the safe side and oil your machine every half a year, or even more frequently. However, if you’re a hobbyist who only gets to sew a couple of times a month, you can get away with oiling your machine once a year, or even once every two years. You can do it yourself, or go to a professional sewing machine servicing shop to have it done. In any case, you should still bring your machine to a professional for a general checkup every couple of years, even if you don’t think that there’s anything wrong with it.
- Tip: The best indicator that your machine is in need of oiling is the sound it makes when sewing. If stitching becomes much louder, or you hear buzzing or humming while your machine works, it might be a great time for cleaning and oiling.
No matter how often you oil your machine, you should always clean it beforehand. Oiling a dirty machine can create a huge mess that can be easily prevented!
Still, oiling your sewing machine is not the cure for everything. If the repairman says that it’s broken beyond repair, it may be the time to look for a great new sewing machine.
Wrap Up
Whether you own an old, cheap sewing machine, or a top-of-the-line model, if you want it to serve you well – you should treat it right. Regular maintenance is very simple, and it requires almost no special equipment at all. After all, if you spend a bit of time cleaning and oiling your sewing machine every year, you ensure that the machine works as well as news for years to come.
We hope we managed to explain exactly what you need to do to keep your sewing machine in excellent shape in simple and understandable terms. If you have any questions left, feel free to leave a comment below, and we’ll get back to you as soon as possible!