When you’re new to sewing, you just want to start stitching. However, setting up and threading your sewing machine has to be done first and it seems so complicated. The entire ordeal can seem frustrating when you’re just getting started but don’t fret – in no time, you’ll figure out that threading your machine can be quick and easy.
I remember the frustration of learning how to thread my good, old Singer Tradition. It took me 20 minutes to do it right on my first attempt! That’s exactly why I decided to make this series of guides that will walk you through all the steps from unboxing and setting up your sewing machine, threading it, and setting up the bobbin.
Nailing Down Sewing Machine Anatomy
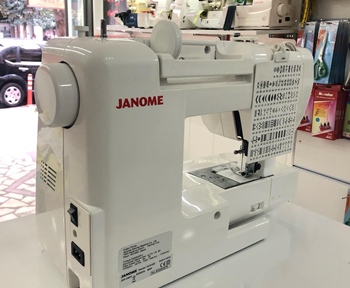 Before I jump into explaining how to thread a sewing machine, we need to nail down the anatomy of a sewing machine just to make further explanations easier to understand.
Most sewing machines look pretty much the same – so learning how to thread a Janome sewing machine won’t be too different than, say, threading a Singer. Of course, specialty units like serger sewing machines are completely different, but the regular kind hasn’t really changed much since they started making electric models.
At the very top of your sewing machine, the easiest thing to recognize is the top spool pin – the place where you should place a spool of thread can be either vertical or horizontal. To the right of that pin is a bobbin winding mechanism that you can ignore for now. To the left of the spool pin are a bobbin winding tension disc (it looks kind of like a button, and you won’t need it just yet), and further left is the first stop your thread from the top spool will take – the thread guide.
What else?
On the right side of your machine is the flywheel, which you can turn to manually move the needle. Remember to always turn the flywheel towards yourself, and not away from yourself, unless it’s a very tiny adjustment. On the front of the machine, you can see a dial or a set of buttons that let you select the type of stitch you want to use and a numbered dial that lets you make your stitches shorter or longer (you should play with these later on!).
You might notice a U-shaped opening on the front of the machine, right above the needle. If you look inside, you’ll see something called a take-up lever. Grab the flywheel on the right of the machine and move it – and you’ll see that not only the needle is moving, but this take-up lever does too! This piece plays an important role in threading your machine.
If you don’t already have a needle inserted, check out my blog article on how to set up your sewing machine straight out of the box. The metal plate under the needle is called a needle plate, and a small spool of thread called the bobbin is located right under it.
Threading the Top Spool
Before we begin, take a closer look at your sewing machine. In many cases, the manufacturers print out a diagram explaining how to thread on the machine itself. The diagram might be numbered, or even contain little drawings of the thread path. However, if your sewing machine is old, the diagrams might be long gone or nearly unintelligible. Don’t worry, most sewing machines rock a fairly simple, universal construction, making it possible for me to give you instructions that apply to most electric sewing machine models out there.
First of all, you should identify and locate some parts of your sewing machine. I explained where most of these are positioned above. If you need more help finding these, you can refer to my blog post explaining the anatomy of a sewing machine. Here’s the list of parts you’ll use for threading:
- Presser foot lifter (usually a lever behind the presser foot)
- Top spool pin
- Thread guide on the top
- Flywheel
- The take-up lever
- Needle
Step by step
Once you know where each of the parts is located, grab the thread that you want to use, and let’s get going.
- Set up the thread on the top spool pin. If it’s a horizontal one, set it up so that the thread is unwinding towards you from the bottom (like the wrong way of hanging a toilet paper roll). If you have a horizontal spool pin, attach the spool cap to the top of the pin – this will hold your thread in place.
- Run the thread to the left towards the thread guide. Attach it to the thread guide and then pull the thread towards yourself to make sure the thread guide puts some tension to it but doesn’t stop it from moving.
- Now it’s time to run the thread through the U-shaped slit. First, let it go down, then when you reach the bottom of the slit, go up towards the take-up lever
- Turn the flywheel towards yourself to make the take-up lever go in the highest position (notice how this is not equal to the highest position of the needle). Then, run the thread through the eye of the take-up lever and then turn it downwards towards the needle. Attaching the thread to the take-up lever might prove tricky because it’s so snug inside the slit – I kind of just bring my thread up and then down over it, which makes it sit in the right position on its own.
- Put the thread through the thread guide just above the needle. This is either a hoop or a piece of bent wire that holds the thread close to the needle mechanism. Not all sewing machines have this part, if yours doesn’t, proceed to the next step.
- Now you can thread the needle. Always thread from the front of the needle towards the back. You might notice that getting the thread through the eye of the needle is not the easiest task out there, so I’ll give you some tips in a bit. If you do manage to do it right away, congrats! Make sure to pull out a few inches of the thread through the needle, so it doesn’t get pulled out as soon as you start your machine.
Getting the Thread through the Needle
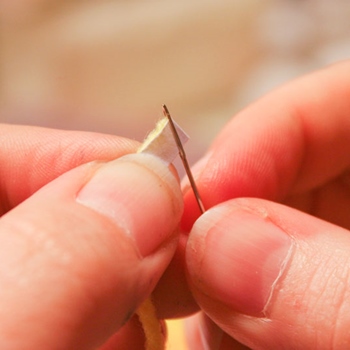 If you’re having issues getting the thread through the needle eye, you’re not alone!
Here are some tips to help you do it hassle-free.
- Some machines come equipped with an automatic needle threader. If yours does, you’re in luck – you can avoid so much frustration with this little device. This is a part of the machine that is installed on the left of the machine, and it runs the thread through the eye of the needle automatically once you set up your thread on it. Check this video out if your machine has one!
- You can use a manual needle threader as well – it’s the little tin or plastic piece with a diamond-shaped fine wire on top. Using it is quite simple: push the diamond-shaped wire hoop through the eye of the needle (push it in from the back, so that the wire hoop is turned towards you). Then, take your thread, and put it through the wire hoop. Finally, pull out the needle threader – as you do this, the hoop will pull the thread together with it, making the thread go through the eye of the needle nice and easy!
- If you don’t have any of these devices, sometimes it helps just to make sure your thread is neatly cut – having the tip of the thread unravel with strings flying about makes pushing it through the eye of the needle so much more complicated. Cut it neatly with scissors and try again.
All Set!
And that’s it! Once you get used to threading your machine, it will become super easy and quick, so remember that practice makes perfect! When your machine is threaded from the top spool, you can finally go on and set up your bobbin – and then you’re all set and ready to sew.
I hope I helped you figure out how to thread your sewing machine with ease. If you have any questions left, don’t hesitate to leave a comment down below, and I’ll get back to you as soon as I can. By that time, happy sewing!