 Monograms are a fantastic way to give a dash of personality to any piece of cloth. A monogram or an embroidered picture or logo can make your shirts, PJs, tablecloths, and scarves leave looking elegant and truly yours.
An embroidery machine lets you make incredibly complex decorations very quickly. Ranging from simple name initials, logos, and designs, to pictures with many colors, embroidery machines do it all. But can you do the same with a regular sewing machine?
There’s no simple answer to this question. Regular sewing machines come with basic sewing options, but you can use the various stitches to create letters or images. However, doing that well is not as simple as it sounds.
Let’s delve into this topic and see what exactly your regular sewing machine can do, and which projects require a specialized embroidery machine.
Embroidery vs. Regular Sewing
The right choice between a regular sewing machine and an embroidery machine depends entirely on your particular situation and needs.
If you’re completely new, you may be wondering whether you should get one or the other. If you’re just starting out with machine sewing, we recommend going for a simple beginner sewing machine. That’s because a regular sewing machine can be used for many purposes, while embroidery machines typically do embroidery exclusively (except for combo machines). On the other hand, if you already own a good regular sewing machine, there’s no harm in getting one for embroidery as well.
In any case, let’s take a look at what the two types of machines bring to the table when it comes to embroidering and monogramming.
Embroidery Machines
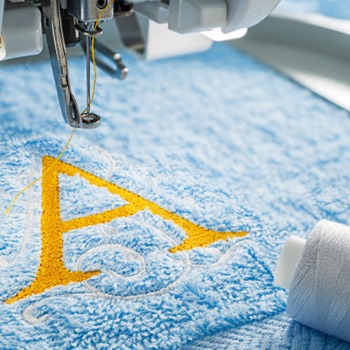
Most embroidery machines are created with one main goal in mind – automatized embroidery. They are made with powerful computers that allow you to download any design you want, and transfer it into the machine.
Once the computer reads the design file, it can start embroidering. Most of the work is done by the machine, with an important exception. Namely, you must be next to the machine to change the thread manually. Some industrial-grade embroidery machines can use several thread spools, but that’s not the case with most commercial models. On the other hand, many home-use embroidery machines come with an automatic thread cutter, which leaves you with a neat, ready-to-wear embroidery.
The most significant advantages of a specialized embroidery machine are that the job is usually flawless, but also extremely quickly and easily. You only need to know how to download and transfer the design and set up embroidering.
When it comes to versatility, most embroidery machines don’t have other functions – they’re simply there to embroider. That means that most of these machines can’t even do a basic sewing stitch. Just like quilting machines, embroidery machines are mostly used by experienced seamstresses who already own a regular sewing machine.
Pros
- The monogramming and embroidering process is almost entirely automated
- The machines finish embroidering the design very quickly
- You can manipulate and change the designs on your computer or directly on the machine
- The design is made perfect, every time
Cons
- It’s not a small investment to get a separate, specialized embroidery machine
- Getting the design you want requires using the computer
- Embroidery hoops limit the maximum size of your design
- Most embroidering machines aren’t very versatile
Regular Sewing Machines
When we talk about a regular sewing machine, we’re mostly talking about machines that are primarily made to do construction sewing. That includes joining pieces or ends of fabrics, making hems, and working with darts or pleats. In simple terms – making pieces of clothing from fabric.
There are different types of regular sewing machines, and which one you prefer is entirely up to you. Some people enjoy the various stitch options of computerized units (you can check our digital sewing machine reviews for that), while others put greater value into the sturdy and reliable build of heavy-duty sewing machines. Still, despite the particular differences between these, the bottom line is that they’re made to do the same job – construct clothes.
With only a dozen or so of different stitch options and settings, even a basic sewing machine can complete various tasks. Because of that, most regular sewing machines are quite versatile. The downside is that you must do all of the work yourself. Even if you use a computerized model, your hands still need to guide the needle.
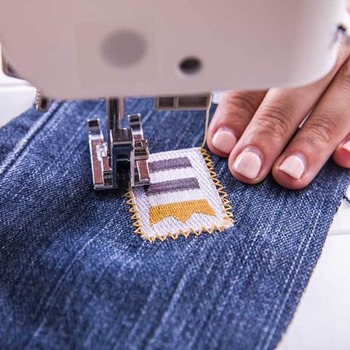
When it comes to embroidering, you can set up almost any regular sewing machine to make a suitable stitch. However, making a beautiful monogram will require quite a bit of patience and focus since the entire process is manual. Compared to using an embroidery machine, it’s tough to reach the same quality and precision in intricate designs. Still, if you simply want to embroider the happy couple’s initials onto a couple of wedding tablecloths, you’ll be able to do the job with some persistence and a regular sewing machine.
Pros
- No need to purchase an expensive separate machine
- You can make anything with enough time and effort
- The design size is virtually unlimited
Cons
- The job is very time-consuming, and it takes a lot of patience
- It takes more active effort and needle guiding to embroider with a regular sewing machine
- Average users are limited to simple designs like monograms of name initials
How to Monogram with a Regular Sewing Machine?
 Setting up for embroidering or monogramming with a regular sewing machine is quite easy. Whether you have a computerized device or you’re setting up a basic model, the required settings are essential, so almost any machine will have the proper options. We’ll walk you through the basics, and you’ll be able to personalize your stuff with good-looking monograms in no time.
1. Stitch Setup
The very first thing you need to do is set up your stitch. Get a spare piece of fabric that you can use to test and modify your stitch until you find exactly what you want.
In general, you should choose a zig-zag stitch for embroidering. The stitch length (how long each stitch is) should be set up to 1.5 or 2, but you can choose a bigger number if it fits your design better.
To make a curve and choose the shape of your embroidery, you need to move the fabric in accordance with the needle. To make that easier, check if your sewing machine gives you the option to lower feed dogs. This setting is often used for quilting – since the job of feed dogs is to make sure your fabric travels under the needle in a straight line, resulting in straight stitches. Many sewing machines give you a simple way to lower the feed dogs, but you should check in your user manual or online for instructions. If your model doesn’t have this feature, you can get a feed dog cover plate.
If you want to make embroidering even easier, we recommend getting a darning foot. This foot is made so that it lets the fabric move freely when the needle is up. This makes it easier to control the fabric and your work.
2. Prepare the Fabric
Next up, you need to prepare your fabric. One of the biggest issues with embroidering on a regular sewing machine is the fact that fabric tends to stretch, fold, and generally misbehave, while embroidering requires a lot of control over the fabric.
That’s why you need to stabilize the fabric before you can start working on it. There are various ways to do this, but the most popular are using fusible interfacing, spray-on stiffeners, and embroidery hoops. Fusible interfacing is often water-soluble, and since it adds stiffness, it’s very useful with stretchy fabrics. To apply it, you need to iron it to the wrong side of your fabric. On the other hand, spray-on, typically starch-based sprays have a simple and easy application. Finally, an embroidery hoop is the classic but very reliable approach to stabilizing your fabric.
Before you can start embroidering, you need to draw your design on the fabric. Use a pencil or marking chalk, since these will disappear once you wash your garment. Drawing the design beforehand will help you get exactly the results you want.
3. Start Embroidering
Place your fabric under the needle so that you can start working on your embroidery or monogram. Start stitching and move your fabric slowly. Adjust how quickly you move to how dense you want your embroidery stitching to be.
You control the direction. If you need to make a sharp turn, or you need to change directions, stop stitching, raise your foot, and pivot. If you have your feed dogs lowered or covered, making soft turns should be effortless.
Remember that practice makes perfect. Try out your design on a piece of spare fabric. Getting a uniform, neat look when embroidering with a regular sewing machine is not as easy as it sounds, but all it takes is a bit of patience.
Wrap Up
To sum things up, yes, monogramming with a regular sewing machine is entirely possible. However, it’s far more efficient and easy to do it if you own a specialized embroidery machine. If your goal is to personalize a piece of clothing here and there, a regular sewing machine will most likely be more than enough for the job. However, if you hope to embroider logos, images, or other, more complex designs, an embroidery machine is a worthy investment for you.
The truth is that there’s no right or wrong choice in this case. Embroidering with a regular sewing machine is infinitely harder, but also a more engaging, fun, and rewarding work. On the other hand, flawless-looking results are guaranteed if you opt for the specialized machine. Whichever you choose, remember to have fun while doing it!